Battery switch on travel trailer function is crucial for managing your RV’s power. Understanding how these switches work—whether single, dual, or rotary—is key to preventing electrical issues and ensuring a smooth camping experience. This guide breaks down the types, functions, troubleshooting, and maintenance of travel trailer battery switches, empowering you to confidently manage your RV’s electrical system.
From safely switching between house and vehicle batteries to understanding common problems and preventative maintenance, we’ll cover everything you need to know. We’ll even delve into upgrading your system for improved performance and reliability. Get ready to become a battery switch expert!
Battery Switch Types in Travel Trailers: Battery Switch On Travel Trailer Function
Choosing the right battery switch for your travel trailer is crucial for managing your power sources effectively and safely. Different switches offer varying levels of control and complexity, each with its own set of advantages and disadvantages. Understanding these differences will help you select the best option for your needs and budget.
Single Battery Switches
Single battery switches are the simplest type, designed for use with a single battery. They offer a straightforward on/off function, disconnecting the battery from the trailer’s electrical system when switched off. This provides basic protection against accidental drain and simplifies the system. However, they lack the flexibility of more advanced switches.
Dual Battery Switches
Dual battery switches are designed to manage two batteries, typically a house battery and a starting battery. These switches usually allow for independent control of each battery, as well as a combined mode, connecting both batteries to power the trailer’s systems. This setup is common in larger travel trailers or those with significant power demands. The ability to isolate batteries prevents one from draining the other.
Rotary Battery Switches
Rotary switches offer a more sophisticated approach to battery management, often providing multiple positions for selecting different battery combinations. A typical rotary switch might have positions for: “Off,” “Battery 1,” “Battery 2,” and “Both.” Some even include a “Start” position that connects the starting battery directly to the vehicle’s starting system, while isolating the house battery. This level of control offers great flexibility but adds complexity.
Comparison of Battery Switch Types
| Feature | Single Switch | Dual Switch | Rotary Switch |
|---|---|---|---|
| Number of Batteries Controlled | One | Two | Two or more (depending on the switch) |
| Control Options | On/Off | On/Off for each battery, Combined | Multiple positions (e.g., Off, Battery 1, Battery 2, Both, Start) |
| Cost | Low | Medium | Medium to High |
| Installation Complexity | Low | Medium | Medium to High |
Troubleshooting Common Battery Switch Issues
Your travel trailer’s battery switch is a crucial component, controlling the flow of power to your house batteries. Problems with this switch can leave you stranded without lights, appliances, or even the ability to charge your batteries. Understanding common issues and troubleshooting steps can save you time, frustration, and potentially a costly repair.
No Power to the Trailer
This is the most frustrating problem. If you’re getting no power to your trailer’s interior systems despite having seemingly charged batteries, the battery switch is a prime suspect. The issue could stem from a simple switch position problem or a more serious internal failure.
- Check the Switch Position: Ensure the switch is firmly in the “ON” position, connecting the batteries to the trailer’s electrical system. Sometimes a loose or improperly seated switch can cause an intermittent or complete power loss.
- Inspect the Switch for Damage: Look for any visible signs of damage, such as cracks, burns, or loose wiring. A damaged switch needs replacement. A severely corroded switch may also be at fault; clean it thoroughly and re-check the connection.
- Test the Batteries: Use a multimeter to check the voltage of your house batteries. If they are discharged, charging them may resolve the issue. If they’re not charging, the problem might lie in the charging system, not the switch.
- Check Fuses and Breakers: Check the fuses and circuit breakers both in the trailer and at the tow vehicle’s battery. A blown fuse or tripped breaker could be the root cause, preventing power from reaching the switch or the trailer’s systems.
- Verify Wiring Connections: Examine all wiring connections to and from the battery switch. Loose or corroded connections can interrupt power flow. Clean any corrosion and tighten loose connections.
Intermittent Power
This is often more difficult to diagnose than a complete power failure. The problem could be related to loose connections, a failing switch, or even environmental factors like vibration.
- Inspect Wiring and Connections: Carefully inspect all wiring connected to the battery switch, paying close attention to any connections that might be subjected to vibration during travel. Loose connections can cause intermittent power loss.
- Test the Switch: While someone operates the switch, use a multimeter to monitor the voltage at the switch terminals. Intermittent voltage readings indicate a problem with the switch itself.
- Check for Corrosion: Corrosion can build up on the switch terminals and connections, causing intermittent contact. Clean the terminals and connections thoroughly with a wire brush and corrosion remover.
- Assess Environmental Factors: Consider whether exposure to moisture or extreme temperatures might be affecting the switch’s operation. Relocating the switch to a drier or better-protected location may help.
Overheating
An overheating battery switch is a serious issue and indicates a problem that needs immediate attention. This is often a sign of high current draw or a faulty switch.
- Check for High Current Draw: An unusually high current draw can overheat the switch. This could be caused by a short circuit somewhere in the trailer’s wiring. Use a multimeter to check the current draw on the circuit to identify the source of the problem.
- Inspect for Loose Connections: Loose connections can create resistance and generate heat. Carefully check all wiring connections to and from the switch.
- Replace the Switch: If the switch is overheating, it’s likely faulty and should be replaced immediately to prevent fire hazards. Do not continue to use an overheating switch.
Troubleshooting Flowchart
A simple flowchart can help guide you through the troubleshooting process. While a visual flowchart isn’t possible in this text-based format, the steps above are already presented in a logical, sequential order. Begin with the simplest checks (switch position, visual inspection) and progress to more complex tests (multimeter checks, wiring inspection) if necessary. Always prioritize safety and disconnect power before performing any wiring checks or repairs.
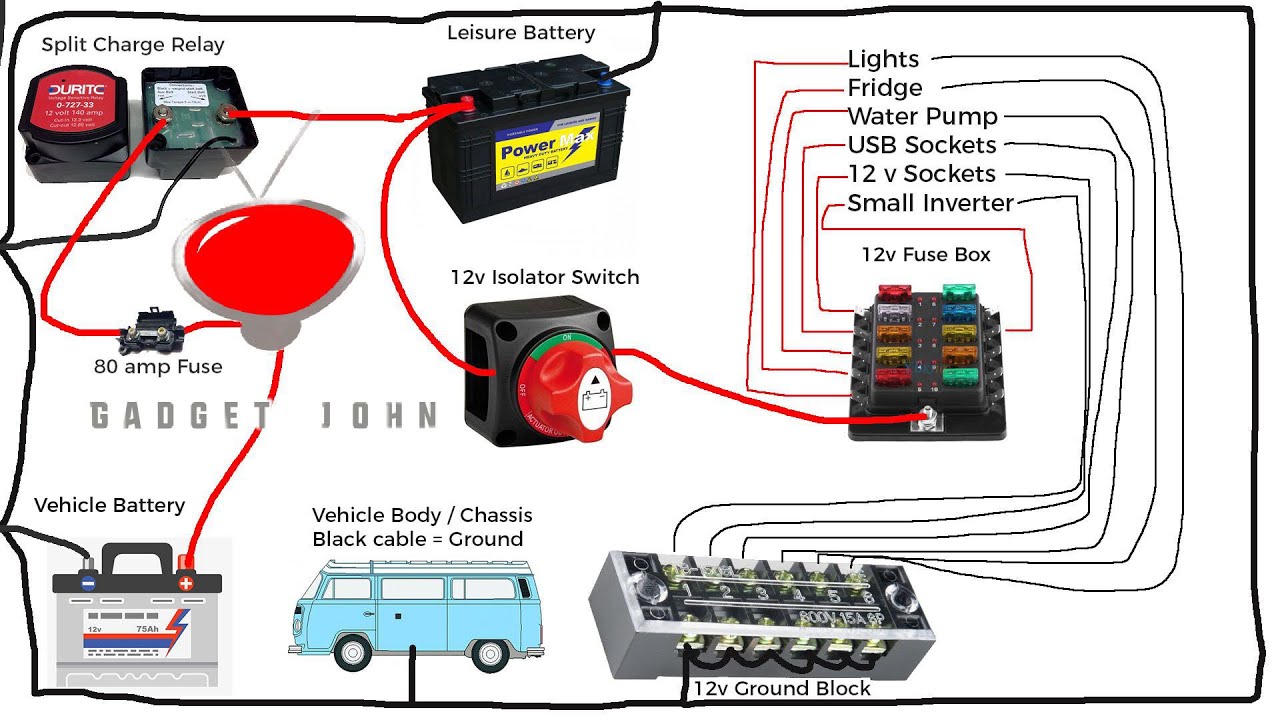
Wiring Diagrams and Schematics
Understanding your travel trailer’s electrical system is crucial for safe and reliable operation. Wiring diagrams provide a visual representation of how the various components, including batteries, switch, and loads, are connected. By interpreting these diagrams, you can troubleshoot problems and make informed decisions about upgrades or repairs. This section will explain how to read and understand common wiring diagrams for travel trailer battery systems.Wiring diagrams use standardized symbols to represent different electrical components.
So, you’re an audiophile who travels? Awesome! Check out this guide on building the perfect audiophile travel setup to ensure your ears are always happy on the go. And while you’re planning your trip, remember to sort out travel insurance – getting Aon travel insurance is a smart move to protect your investment (and yourself!).
Peace of mind is priceless, especially when you’ve got expensive headphones to worry about!
A simple diagram might show a battery represented by a series of parallel lines (+ and – terminals clearly marked), a battery switch depicted as a switch symbol with the battery connections indicated, and the trailer’s loads (lights, appliances) shown as simple boxes or other symbols. Lines connecting these components represent the wires, and their thickness might indicate wire gauge.
Arrows often indicate the direction of current flow. More complex diagrams might include fuses, breakers, and other safety devices.
Interpreting Battery Switch Wiring Diagrams
A typical diagram for a simple single-battery system shows the battery’s positive (+) terminal connected to the input of the battery switch. The output of the switch then connects to the positive bus bar or distribution point feeding the trailer’s 12V loads. The negative (-) terminal of the battery connects directly to the chassis ground and the negative bus bar.
The switch controls the flow of power from the battery to the loads. A double-battery system might show two batteries, each connected to the switch, allowing you to select either battery, both batteries in parallel, or neither. More complex diagrams may include additional switches, relays, and charging systems.
So, you’re an audiophile who loves to travel? Awesome! Make sure you check out this guide on audiophile travel setups to keep your tunes sounding amazing on the go. It’s crucial to protect your investment, though, so don’t forget about travel insurance! Consider getting a policy from Aon travel insurance for peace of mind while you’re exploring new places and enjoying your portable audio system.
Planning ahead ensures you can enjoy both your music and your travels without worry.
Examples of Battery Switch Wiring Configurations
The following table Artikels different wiring scenarios and their effects on battery power. Remember, always disconnect the negative (-) terminal before working on any electrical system.
| Scenario | Battery 1 | Battery 2 | Loads | Description |
|---|---|---|---|---|
| Single Battery (Battery 1 Only) | Connected | Disconnected | Powered | Only Battery 1 powers the trailer loads. |
| Single Battery (Battery 2 Only) | Disconnected | Connected | Powered | Only Battery 2 powers the trailer loads. |
| Both Batteries in Parallel | Connected | Connected | Powered (Combined Power) | Both batteries supply power to the loads, providing increased capacity. |
| Both Batteries Off | Disconnected | Disconnected | No Power | No power is supplied to the trailer loads. |
Understanding Power Flow
In a typical dual-battery setup with a selector switch, the switch acts as a gate. When you select “Battery 1,” the switch completes the circuit between Battery 1 and the loads, allowing current to flow. Selecting “Battery 2” routes the power from Battery 2 to the loads. Selecting “Both” connects both batteries in parallel, increasing the available amperage.
The “Off” position breaks the circuit entirely, preventing power from reaching the loads. Understanding this flow is essential for troubleshooting. If a load doesn’t work, checking the switch position is a logical first step. If the switch is in the correct position, you might investigate the wiring between the switch and the load, or the load itself.
Battery Switch Upgrades and Replacements

Upgrading your travel trailer’s battery switch can significantly improve its functionality and longevity. A more advanced switch offers better protection for your batteries and electrical system, often incorporating features that simplify operation and enhance safety. Replacing a faulty switch is crucial for preventing electrical issues and ensuring the reliable operation of your trailer’s 12-volt system.Replacing a battery switch is a relatively straightforward task, but it’s important to prioritize safety and follow proper procedures.
Choosing the right replacement switch depends on your trailer’s specific needs and the features you desire. Several reputable brands offer a range of switches with varying capacities and functionalities.
Benefits of Upgrading to a More Advanced Battery Switch, Battery switch on travel trailer function
Upgrading your battery switch can provide several advantages. A higher-capacity switch can handle increased amperage demands from larger battery banks or more power-hungry appliances. Some advanced switches include features like integrated circuit breakers, providing additional protection against overloads and short circuits. Improved ergonomics, such as larger, easier-to-grip handles or clearer labeling, can simplify operation, especially in less-than-ideal weather conditions.
Finally, switches with improved weather sealing offer greater protection against the elements, extending their lifespan and ensuring reliable performance. For example, upgrading from a simple two-position switch to a switch with multiple positions and an integrated battery disconnect can greatly enhance convenience and safety.
Step-by-Step Guide for Replacing a Faulty Battery Switch
Before beginning any electrical work, always disconnect the negative terminal of your battery to prevent accidental shocks. First, locate your existing battery switch and identify all wiring connections. Take clear photographs or make detailed notes to ensure accurate reassembly. Carefully disconnect each wire, noting its location. Next, remove the old switch using the appropriate tools (usually a screwdriver).
Install the new switch, ensuring it’s securely mounted and correctly oriented. Reconnect the wires according to your notes or photographs, double-checking each connection. Finally, reconnect the negative battery terminal and test the new switch to ensure it’s functioning correctly. Remember to consult your trailer’s wiring diagram for precise wiring instructions.
Comparison of Different Brands and Models of Battery Switches
Several reputable brands manufacture battery switches for RVs and travel trailers. These include Blue Sea Systems, Perko, and others. Features vary widely across models. Some offer simple on/off functionality, while others incorporate multiple switching positions for controlling multiple battery banks or isolating specific circuits. Consider factors such as amperage rating, number of positions, mounting style, and included features like circuit breakers when selecting a replacement switch.
For instance, a Blue Sea Systems model might offer a higher amperage rating and integrated fuse protection compared to a less expensive alternative. The Perko brand is known for its robust construction and weather resistance, often favored in marine applications and transferable to RV use. Always choose a switch with an amperage rating that exceeds the maximum current draw of your electrical system.
Mastering your travel trailer’s battery switch is more than just knowing how to flip a switch; it’s about understanding the heart of your RV’s electrical system. By understanding the different types of switches, their functions, and how to troubleshoot common issues, you can ensure safe and reliable power for all your adventures. Remember regular maintenance and safe practices are your best allies in preventing problems and maximizing the lifespan of your battery switch.
Happy travels!
FAQ Section
What happens if I accidentally leave my battery switch on while driving?
Generally, nothing catastrophic will happen, but it’s best practice to turn it off while driving to avoid potentially draining your house batteries.
How often should I check my battery switch connections?
At least once a year, or more often if you notice any performance issues. Look for corrosion and ensure tight connections.
Can I use any type of battery switch in my travel trailer?
No, the correct amperage rating is crucial. Using an undersized switch can lead to overheating and failure. Check your trailer’s manual for the recommended amperage.
My battery switch is making clicking noises. What does that mean?
This often indicates a problem with the switch itself or a low battery. Inspect the switch for damage and check your battery voltage.
